Tutorials page Submissions page
Click here to subscribe to our newsletter and receive updates by email Click here to take our survey - thanks!


CREATING SIMPLE TERRAIN [MetaForm 1.1]

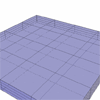
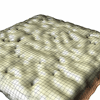
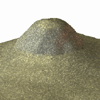
In this tutorial we shall cover the basics of creating a simple terrain in Poser using MetaForm. The terrain features shall be 
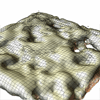
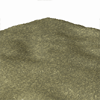
randomly generated by adding noise to MetaForm props.

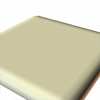
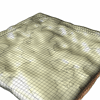
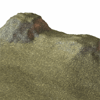
The terrain can then be further supplemented by adding additional shapes to create more regular hills in specific locations.

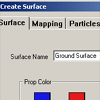
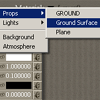
As usual, please ensure that Display Units are set to Poser Native Units in ‘Edit > General Preferences…’, as our tutorial parameter values are calibrated for PNUs.


Start a new Poser scene and begin by creating a new Surface prop.

Open the Surfaces panel in MetaForm and click on the Create Surface button. Name it "Ground Surface" and click OK.

Create Ground Surface

Open the MetaForm Props panel and click on the Plane icon to add a plane prop to the scene. Change the Scale to 200% and increase the Field Extent to 0.2 to add thickness to the Surface that will be created.

Orientate the camera to get a decent view of the plane.

Create plane prop

Click either of the Surfacing buttons to view the Surface that is generated.

Bit flat. Disable Surfacing and we'll make some noise.

Prop plane Surfaced

Select the plane prop and change the Surface Noise parameter to 0.4. Enable Surfacing to see how this affects the Surface.

As you'll see, the Surface now has some bumps and depressions. We have changed Poser's document display style to Smooth Lined to illustrate the Surface's contours. At the moment, the Surface quality is quite low.

Plane with Surface Noise

The detail can be increased by selecting the plane prop and increasing the Subdivision Level. Change it to 24 and shift-click the pressed Surfacing button to re-Surface the scene.

We'll continue to change some of the parameters to see how they affect the Surface's appearance.

Plane Subdivision Level 24

Ensuring you have the plane prop selected, and with Surfacing still enabled, change the Surface Noise parameter from 0.4 to 1. Shift-click the pressed Surfacing button to re-Surface the scene again. Using a high Surface Noise value causes the Surface to break up, as highlighted on the right-hand image in the pop-up. This is sometimes desirable, but often isn't. The likelihood of holes appearing depends on the thickness of the Surface (distance between the top and bottom) and the amount of distortion applied to it.

Experiment with other Surface Noise values and re-Surface to see the effects. Also, try negative values. When you're done fiddling and are ready to continue, set Surface Noise back to 0 (re-Surface to ensure you have a flat Surface again).

Surface Noise

In the parameters for the plane, just under Surface Noise, is Surface Turb(ulence). This varies from Surface Noise in that it only adds noise in one direction (either positive or negative - Surface Noise applies in both directions).

Set the Surface Turbulence to 5 and re-Surface. Set it again to a higher value, say 20. As the noise is positive only, it causes the Surface to swell out with the turbulence. Setting the turbulence to a negative value causes geometry to be removed from the Surface, as all of the turbulence is applied negatively. We used a value of -1 in the third image in the pop-up to create lots of holes.

Surface Turbulence

In the parameters palette, above Surface Turbulence and Surface Noise, is the Volume Noise parameter. This parameter differs from both of the above parameters in that it adds 3-dimensional noise to all points within the prop's field.

Similar to Volume Noise, if the value is high (in this case set to 1), holes become apparent. Try some different values, including negative values.

Volume Noise

Set Volume Noise and Surface Turbulence back to 0. Set Surface Noise to 0.4 again.

We'll now add a material to the Surface prop so it looks a bit more like terrain. You can choose any you wish, but I'll run through adding a standard Poser 5 material from the Material room.

Enter the material room and select the Ground Surface from the object menu. Layer 0 is the default outer layer and should be selected by default. Materials should be applied to this layer.

Select Ground Surface in Material room

In the library, select a suitable looking material - grass, sand, etc. - and apply it to Layer 0 of the Ground Surface. We used a standard sandy ground material.

When done, return to the Pose Room and render your scene (ensuring Surfacing is enabled) to see your bumpy landscape.

Surface rendered with material

Let's add a hill or two. Disable Surfacing. From the MetaForm Props panel, click on the Cone icon to add a 'hill'. Place this in the scene somewhere. Set the following:

Scale to 500%
yScale to 50%
Subdivision Level to 24
Field Extent to 0.2

In the 3rd image in the pop-up, Surface Noise of 0.2 was added to distort the cone to make it more irregular. Experiment with the cone's Surface Noise and and Field Extent parameters to see how they affect the size and shape of the hill.

Cone added

To continue, you might want to add a few more cone props and set their parameters similar to the first hill (parameters above). Another "hill"

With some quick post-production on the background, we have some hills at sun-down.

Final image


To top of page top 

 
Back to home