|
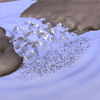
This tutorial covers the creation of basic water effects, featuring
running water and pools, all without using emitters. We will show you how to simulate
small waterfalls and pools, as well as adding ripples and other additional effects. |
| Enhanced water material:
We can improve the Water Surface material using U and V coordinates, specifically
the U coordinate. The water can be made whiter (foamy) in places, and transparent
and reflective in stiller areas. This is done by changing individual props' U coordinate
contribution and the material settings for the Surface.
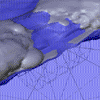
The image on the right illustrates the Poser 5 Material Room settings.
For each area of water that we want to emulate foamy white water (where it is rushing
and bubbling), select the required props in turn and in the parameter palette, set
the UMap Contribution to a value above 0. The higher the number,
the whiter and more opaque this area of water will be (U coordinates go from 0-1,
but values of around 2 can be used to extend the area of a prop's U contribution).
If you wish to investigate how this was done, as well as see the settings used for
props and the water material, you can download the enhanced Poser scene
(.pz3 file) - Poser 5 version
(682 KB) or Pro Pack version
(675 KB).
Download the animation of this enhanced scene here. |
 |
The following table explains the water material settings in more detail.
| |
| Multiply by U coordinate |
| Multiply by U coordinate |
| Multiply by U coordinate |
| Multiply by 1-U coordinate (invert) |
| Multiply by 1-U coordinate (invert) |
* Specularity cannot be adjusted in Pro Pack.
** For transparency, low input values are transparent and high input values are opaque
(solid).
*** Reflections and refractions are not available in Pro Pack.
These effects can be achieved in Poser 5 by attaching the U coordinate variable and inverted
variable to the correct nodes in the Layer0 surface material. In Pro Pack, the variations
can be controlled by applying a simple gradient image as the diffuse and transparency maps
to Layer0. See the .pz3 files for the final material settings.
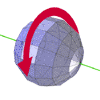
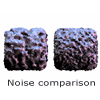
| On the right is an image which compares some values of Volume Noise,
Noise Scale and also illustrates Noise yScale,
which is useful in this context (to create wave shapes by stretching the noise along
the cylinder's Y axis). You can refer to the MetaForm user guide if you require full
explanations of these parameters. |
 |
All zip files contain a readme - please see this file for installation instructions. All
of the above files are copyright-free, so feel free to modify and redistribute them. Also,
all scenes require MetaForm installed, as MetaForm-specific props are present in each.
 top top |